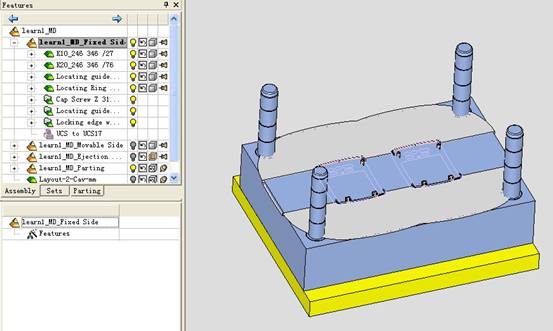
2: The effect is as follows: 3: Select load work parts in the right toolbar, select the workpiece aa.elt. and set the shrinkage compensation to 1.005, and determine to select two coordinates in turn. 4: Here the system will automatically divide the maximum appearance of the product into four sides and put it into the middle coordinates. We can see that the workpiece is not placed in the direction we want now, but it should be noted that there are two ways to adjust it, one is to adjust by clicking Layout UCS, and the other is to double-click the AA-WORK part. To operate, I am used to the second. 5: After rotating it to the desired direction (for the axis of the coordinates, the product center will not move, here is the rotation -90 degrees), as shown: 6: Now let's modify the layout, that is, change the mold position. You can modify it by double-clicking on the layout of the wireframe. The middle dimension is the distance between the control work parts. The outer largest rectangle represents the standard mold frame size of the mold. We adjust the layout part size as shown below: (BYT: Any size parameter of each component in CIME can be modified by double-clicking). 7: We are now performing mold analysis. CIME8 has improved the analysis tool and can analyze whether the directions are reasonable before the quick disconnect. Click Analysis tool---open direction analysis, this new function is quite good, it is completely dynamic in the analysis of the draft angle of the mold, and the most popular place is that you can not quickly disconnect, the direction of the parting can be customized. 8: Quick disconnect after analysis. Click parting---Quicksplit. Note: It is necessary to double-click the aa-work part to operate. Some surfaces in the diagram that are not processed by the system should be manually classified. The effect of doing well is as follows: 9: Establish external and internal partial lines. 10: Now do the parting surface, first make the inner part of the surface. Note that the middle face of the large face is the same as the previous E5 parting. It should be done by the modified boundary of the back face. After the trimming is done, the bumper surface automatically generated by the system is incorrect. After doing well, as shown in Figure 2: 11: Now let's do the outer part. Note that if this integrated parting method is used, the inner part of the line is made in the product (that is, the AA-WORK is activated), but the outer part of the profile is to be newly created with a parting surface part. The outer part of the profile is made in this part. As for why it is so, don't ask, look at it naturally. Double-click learn1_md_parting to activate this partial assembly. Click on the parting--parting surface part in the right toolbar. The name will be the default name of the system, as shown in the figure: 12: Click parting surf--External in the right toolbar, select the outer part line we made above, change the parameter to 80, and make the outer part surface as shown. 13: In the same way, make the other side, trim it well. If you feel that the broken surface is too uncomfortable, use the surface combination function to combine the faces. The effect is shown in Figure 2: 14: Attach the outer partial faces separately with the parting surface attribute additional function as shown in the figure. 15: The outer partial profile is stitched with a curved stitching command. (The inner part of the profile is not stitched, which is different from the E5's parting method. What we are doing now is the integration of the E8). 16: Now let's use the measurement command to measure the distance between the parting plane we made and the original coordinates of the system, remember this number. 17: Click Layout UCS on the right toolbar to set the parameters as shown in Figure 2. We can see that the large plane of the parting plane coincides with the layout plane. (BTY: This step is why I used to choose the second manual orientation in the fourth step. What do you think?) 18: OK, now we can join the formwork. Of course, first of all, your CIME8 must be equipped with a mold base library. 19: Load the mold base, click the command as shown in Figure 1, and set the parameters as shown in Figure 2. After setting it, click NEXT to enter the setting interface of Figure 3. 20: Click Next again to enter the following figure 1. Select select all and click finish to complete the loading of the mold base. The effect is shown in Figure 2: 21: We are now doing it step by step, first hiding the other, leaving only the part of the front mold. And activate the fixed mold assembly. 22: Create a new part, take the name CAV, and place it in the original coordinates of the total assembly. 23: We can see that this part is in the state of automatic activation. Now let's draw a rectangle with the large plane of the parting surface as the sketching plane. 24: Stretch a solid with a height of 41MM from this rectangle. 25: Cut the A board with this entity. Get the frame of the A board. 26: The same part of the dynamic mold assembly also created a new part called COR, stretch a rectangle down 31MM, up 50MM to cut out the B board, get the B board as shown below: 27: Use the outer part of the profile to cut the solid body we have in CAV/COR. Remember, it is cut with the stitched outer part. 28: OK, now is the most crucial step, activate the main assembly, hide all the pixels, leaving only aa-work. 29: Click Transfer to part in the right toolbar, click on the front die face (only one is enough) ----- middle button ----- select part CAV---- confirm. In this way, the back surface is transferred to the COR, and then activated by the surface stitching command to stitch into a solid. Because we are going to start doing the position, slanting the top, ejecting the system, cooling the system, and the pixel will be better if it is an entity. When we transmit the components of the front and rear modules, we will find that the system will automatically select the inner part together, which is why I emphasized in step 11 why the outer part is to be in a specific part, and The reason why the inner profile is made in the product part. It seems to be troublesome, and I am used to knowing the benefits of doing so. Do a good job as shown in the figure: 30: In the CSLONG moderator's oblique top cutting tutorial, we can find the method of making the oblique top. The effect is as shown in the figure: Attached to the CSLONG moderator's tutorial, this is his original. Everyone will do as they please, and I will not be arrogant. See http://bbs.icax.cn/viewthread.php?tid=359264&highlight= 31: Activate COR, click file---export---to part in the drop-down menu above, select four oblique tops, name the file RH, and save. Figure 1: Then activate the dynamic mold assembly, click on the icon shown in Figure 2, add the part RH, select the main coordinates when you choose to place. Figure: 32: The same reason cuts out the plane of the plane. The steps are the same as step 30, as shown: 33: Activate COR, and output the cut line plane by the method of step 31, and you can just name it. 34: Activate the movable mold assembly, first make the YZ plane through the main coordinate, and then click the command shown in Figure 1 to join the slider unit. Select the slider system shown in Figure 2. Place it on the YZ plane we just made. Figure 3: 35: In the above Figure 3, click the parameter Create sketch to open the sketching tool. Select the add geometry shown in Figure 1 to define the midpoint of the line segment shown in the figure. 36: Select the parameters as shown. We found that this slider is too large, so return to the steps shown in Figure 2 to change the parameters. Be careful to choose a non-standard. (Because this figure is not reasonable with standard sizes, it is changed to non-standard for modification). 37: Modify to the appropriate size, double click on each part to change. 38: Similarly, make another slider. 39: Activate the B board, draw the rectangle with the bottom of the slider as the plane and the largest side of the slider as the boundary. The B plate is then cut with this rectangle. 40: Similarly, activate COR, draw the rectangle with the bottom of the slider body as the plane, draw the rectangle with the largest side of the slider body as the boundary, and then cut the COR part with this rectangle. 41: Now start the cooling system, activate the main assembly, only display the A board and the front mold (CAV), and make the following sketch on the plane 20cm up from the A board: 42: Click on the command as shown to make a cooling body. 43: Add cooling parts, faucets and water plugs. The nipples are water nozzles, and the PLUGS are water plugs, which are placed at the center of the cooling passage outlet. The effect is as follows: 44: Flow path. Display the moving mold, hide the other, and make an approximate 2D plane with the curved surface in the middle of the moving mold. Then draw the sketch as shown: 45: Generate the runner body, here we do the trapezoidal. Figure: 46: Flow path body cutting. 47: The last step is to eject the system. Click the command as shown in Figure 1. The interface shown in Figure 2 appears. Select Ejector pin-----Ejector pinZ40. Select the Calculate Length system to automatically calculate the longest thimble length. The system calculates the maximum length of 137.393. We choose 160 long. Here, we use a 3MM diameter ejector. Enter the figure in Figure 2 and click on Create Sketch. Here you only need to define the point, so use the grass to draw the position where the thimble is to be placed. Since it is a tutorial demonstration, we don't consider the position of the thimble. Now I only take a few points at random. The real thing to do is of course to consider the stress analysis of the product, the position of the ram, the shrinkage of the product, the water mark and the like. 48: The ejector is removed. We saw that the ejector rods grew a lot of molds, because we chose a 160-long ejector rod, so we cut them and select all the ejector rods. After cutting, see Figure 2: 49: The ejector pin is cut, but the ejector groove is not cut yet, and the cutting operation of the ejector groove is performed below. The meaning of each parameter can be clicked on the triangle arrow in Figure 2. The system has a diagram. After cutting the top rod slot, as shown in Figure 3 and Figure 4, Figure 3 and Figure 4 are the commands for dynamic cross-section. . 50: You're done, get an exploded view and check it out. In fact, there are still some small places that have not been done. For example, although the buckles are drawn under the slanting top, the rods that are ejector are not painted, but the steps are said. Isn’t it the hand to do this? The repeated steps are no longer said. It is. Aluminum Shower Door Frame,Aluminum Shower Door Frame Producer,Aluminium Partition Profile Shandong Huajian Aluminium Group Co., Ltd. , http://www.sdaluminumprofiles.com 1: We open Cimatron E and click the mold setting icon, enter the learn1 assembly name, check the Create a new folder option, and the system automatically creates the learn1_MD folder. Because we are doing a two-cavity now, the layout is selected as "Layout-2-Cav-mm", confirm.