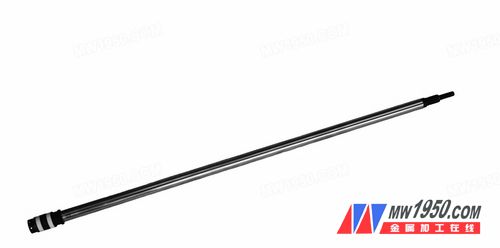
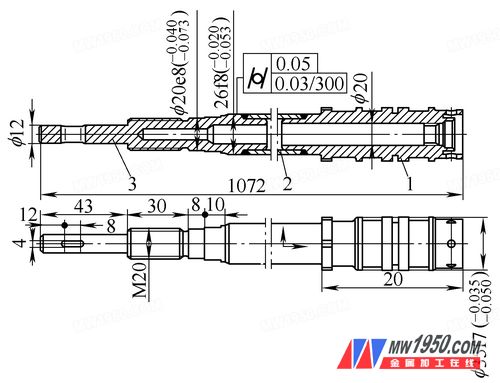
The total length of a moving rod part of our company is 1 072mm, the largest diameter is 35mm, and the smallest diameter is 12mm. The diameter of the moving surface is 26f8 (-0.020 -0.053) mm, which is the main dimension of the part. The total length is 911mm and the aspect ratio is about 35. It is a typical elongated shaft type. In the shaft parts, the slender shaft is difficult to process. Parts and parts are shown in Figure 1. The part is made by welding three parts into the inner hole, and the part material is 30CrMnSiNi2A, and the final heat treatment hardness is 46-50HRC. (1) This workpiece is welded by three parts. Because the length of the part is φ20mm, the inner hole cannot be processed after welding. The inner hole of the part φ20mm must be formed and welded. Since the part is a hollow part with a wall thickness of 3 mm, it is a thin-walled part and has a large bending deformation during welding. (2) The total length of the parts is 1 072 mm, and the diameter of the middle part is 26f8 (-0.020 -0.053) mm, length 991mm, length to diameter ratio exceeds 35, and the smallest part size is only φ12mm and has a waist groove, the rigidity of the part is poor, and bending deformation is easy during processing. (3) The technical quality of the parts is high. The diameter of the moving surface is φ26f8 (-0.020 -0.053) mm, the straightness is 0.03mm/300mm, the cylindricity is 0.05mm, the surface roughness value is Ra=0.2mm, and the processing is difficult. Under the combined effects of welding, cutting force, clamping force and thermal stress, it directly affects the technical requirements of dimensional accuracy, straightness and surface roughness of the part. Since the part has never been processed in this unit, it is a process of exploration in processing. The part dimensions are shown in Figure 2, where the serial numbers 1, 2, and 3 represent three parts. Due to the performance requirements of the parts, the three parts are processed after welding. Parts 1 and 3 are formed on the horizontal lathe to form the inner hole, and the outer circumference is reserved. The total length of the part 2 is 840 mm, and the ordinary processing cannot meet the requirements. Using deep hole processing technology, it is formed by one shot with a gun drill. After the parts are processed, the following process route welding is adopted: preheating (250-350 ° C) → welding → high temperature tempering (650 ~ 680 ° C) → measuring jitter → straightening. When the first piece is processed, due to lack of experience, the conventional welding idea is adopted. The raw material is φ30mm bar material, the wall thickness is 5mm, and the bending deformation of the part after welding and high temperature tempering is 1~1.5mm, and the shape is still 0.7~1mm through the calibration. Can not meet the requirements of less than 0.5mm, plus the uneven wall thickness caused by the bending deformation of the machined parts 2, can not meet the subsequent processing; in order to meet the subsequent processing requirements of the parts, the raw material bar material size is increased to φ40mm, the measurement jitter after welding is basically less than 1mm, basically can reach 0.3~0.5mm through the calibration. At the same time, in order to prevent the bending and rebound after the parts are shaped, a process of low temperature tempering of 180 to 200 ° C is added after the correction. The parts are enlarged to φ40mm before welding, and there is a large margin to be removed after welding, which needs to be ensured by turning and grinding. In the subsequent processing, due to factors such as part clamping, rigidity, cutting amount, heat generated by the tool and the machining, the bending deformation is easily caused, and the parts are over-defected. (1) The clamping is to ensure the straightness of the part is 0.03mm/300mm, the coaxiality is 0.05mm and the surface roughness value is Ra=0.2mm. In the process of turning and grinding, double top clamping is mainly adopted. When detecting the steps of turning, grinding and heat treatment, the center hole is the basis for its positioning and measurement. During the whole process, the part adopts double top clamping. Due to the jumping of the top hole and the surface roughness, when the part rotates at high speed, the part axis is easily deviated from the machining axis, resulting in uneven deformation and deformation. If the two central holes of the part have different axes, the processed parts are tapered and elliptical, so that the role of the central hole is very important. The center hole at both ends should be coaxial, and the center hole should be trimmed and ground. After grinding, at least the center hole jump is less than 0.01mm, and the surface roughness value Ra≤0.8mm. Pvc Doors,Solid Pvc Door,Pvc Bifold Door,Pvc Concertina Doors Foshan QI'AN Fireproof Shutter Doors Co., Ltd , https://www.qianfiredoors.com
figure 1 1. Technical difficulties in machining the rod

figure 2 2. Welding
3. Metal cutting